
Professional tools remove gems safely.
At one point, a tiny sparkle on a canine or a lateral incisor was the most sought-after fashion statement. With tooth diamonds, or “gems,” one could add a splash of literal radiance to a smile and make it uniquely their own. However, style keeps changing. So, if you are leaning towards a more natural look or simply need to have the gem removed for a different dental treatment, in any case, the procedure should be done clinically.
In our clinical experience at Lema Dental Clinic in Turkey, we often see the results of “at-home” attempts to remove these jewels. A diamond on a tooth may be small, but the bond attaching it to your body is very strong.
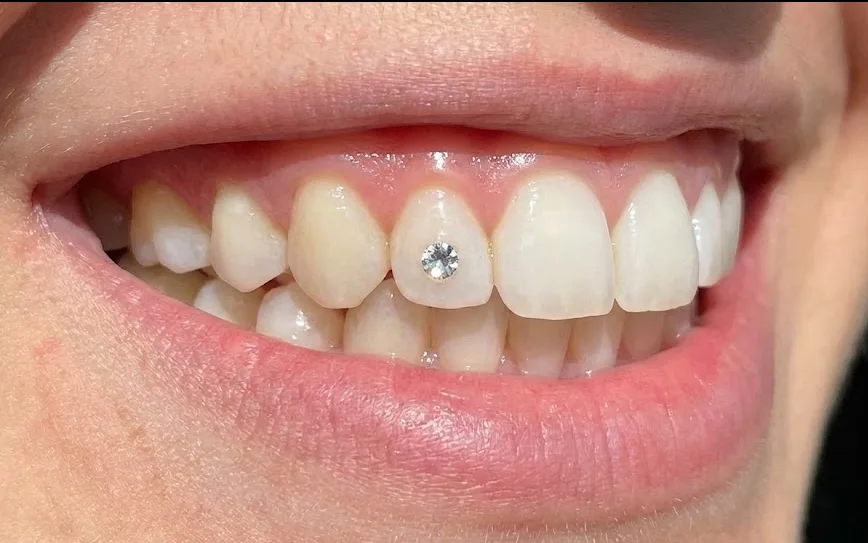
The glue used for fixing a diamond to your tooth is basically the same strong composite resin material used for dental brackets (braces). They are both intended to survive a very wet and pressurized environment of the mouth for years.
Professor Doctor Coşkun Yıldız often points out that tooth enamel is similar to a glass skyscraper that has been polished. If you try to remove a sticker from glass using a jagged knife, you will make permanent microscopic scratches. The mouth is like that but the “scars” are much worse; they are places where bacteria can hide, thus causing decay exactly in the place that used to shine.
The Professional Debonding Protocol
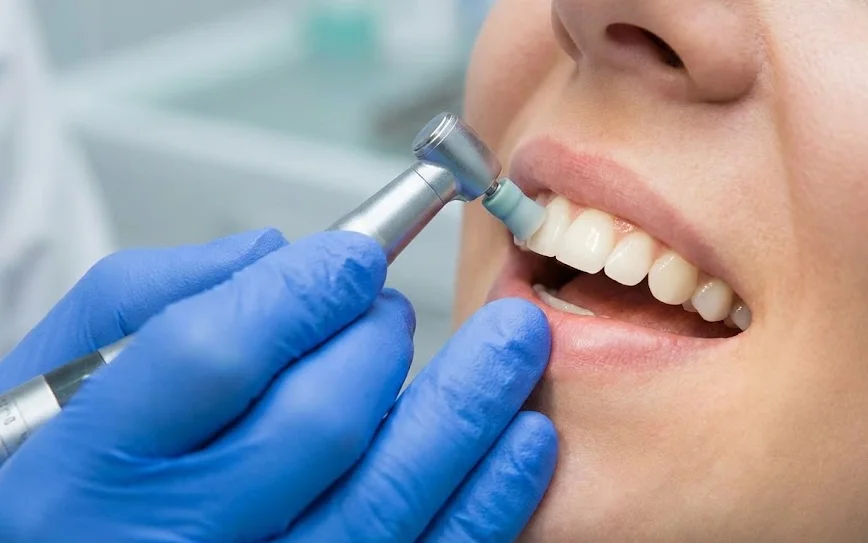
Now, let’s see how we do it in our clinic. We don’t consider the removal of a tooth diamond just a minor cosmetic change; rather, we see it as a restorative dental procedure.
Polen Akkılıç, a dentist, and her team carry out a three-stage procedure to make sure the tooth is returned to its original, pristine condition:
- Sonic Debonding: We employ special tools that deliver ultrasonic vibrations between the resin and the gem, breaking the bond naturally. In this way, the diamond is lifted without putting “prying” pressure that might crack the enamel.
- Macro-Abrasive Polishing: After the diamond has been removed, the part of the resin that has hardened inside is left. With the aid of a few fine-grit polishing disks and slower-speed burs, we carefully remove the leftover. We keep doing it until you can see the natural “glow” of the enamel again.
- Enamel Rejuvenation: A high-strength fluoride varnish treatment is applied at the end to help restore the minerals to the tooth and close any tiny microscopic openings as the removal procedure, even if handled gently, might have caused some temporary stress to the tooth.
Comparing the Paths: Professional vs. DIY Removal
The question remains: is a trip to the dentist really necessary for such a small object? Here is what we see in the clinic when comparing professional care to the risks of self-removal:
| Feature | Professional Dental Removal | DIY / Home Removal Risks |
| Enamel Safety | Guaranteed; uses non-invasive polishing. | High risk of permanent scratches or “pitting.” |
| Residue Removal | 100% of resin is cleared. | Yellowish, sticky spots often remain. |
| Sensitivity Risk | Low (managed with fluoride). | High (due to exposed enamel layers). |
| Tools Used | Ultrasonic tips and slow-speed burs. | Metal tweezers, fingernails, or abrasive files. |
| Time in Chair | 15–20 minutes. | Permanent damage in seconds. |
The “Lema” Standard of Care in Turkey
At Lema Dental Clinic, we understand that our patients travel to Turkey for excellence in both the major surgeries and the minor aesthetic refinements. Removing a tooth diamond is about more than just aesthetics; it is about preserving the structural integrity of your smile.
The question isn’t just about getting the diamond off—it’s about making sure no one can ever tell it was there in the first place. Through the careful hands of Dentist Polen Akkılıç, we ensure that the transition from a “sparkling” smile to a “natural” one is seamless.
Your Smile Transition: Common Questions Answered
The reality is that the process is entirely painless. Since we are only working on the surface of the enamel—which has no nerve endings—you won’t even need local anesthesia. You’ll mostly just feel the vibration of the polishing tool.
If the gem was originally placed by a professional and we remove it using our clinical protocol, there should be no mark at all. However, if the tooth wasn’t cleaned properly before the diamond was put on, there might be a slight color difference. We can easily fix this with a quick professional whitening touch-up.
It is one of our quickest procedures. Usually, you are in and out of the chair in about 15 minutes. It’s a very small time investment to protect your tooth’s foundation.
Technically, yes. However, Professor Doctor Coşkun Yıldız usually recommends giving the enamel a week or two to “breathe” and remineralize before applying a new bond.
This is a common call we get. That roughness is likely the leftover resin or, worse, a small “shelf” where enamel was pulled away. Please don’t try to sand it down yourself! Come see us at Lema Dental Clinic, and we will smooth it out professionally to prevent future decay.
- Artun, J., & Bergland, S. (1984). Clinical trials with crystal growth conditioning as an alternative to acid etching. American Journal of Orthodontics, 85(4), 333-340. (Relevant to the strength of dental bonds).
- Wajid, M. A., et al. (2020). Tooth jewelry: A new fashion trend in dentistry. International Journal of Applied Dental Sciences.
- Bishara, S. E., & Trulove, T. S. (1990). Comparisons of different debonding techniques for ceramic brackets: An in vitro study. American Journal of Orthodontics and Dentofacial Orthopedics, 98(2), 145-153.
- Ireland, A. J., et al. (2003). An in vivo investigation into the effects of various debonding methods on enamel surface. British Journal of Orthodontics.
- Pithon, M. M., et al. (2014). Effects of different polishing systems on enamel surface after debonding. Journal of Applied Oral Science.